Using Ubuntu Linux as a TFTP Server
In the Cisco Switching, Routing and Wireless Essentials class I teach, one topic I cover is how to configure a switch or a router from a TFTP server.
In most cases, people are familiar with the Cisco iOS command: configure terminal. This command allows you to enter switch configuration commands one line at a time from the terminal.
There is another format of this command that allows you to download a configuration file with configuration commands from a TFTP server then execute the commands in the file. This is useful if you need to backup a configuration file or keep a skeleton configuration file that you use on various switches with minor modifications (e.g. changes to the switch IP address used for management purposes).
The lab that I have the students complete for this activity has the following steps:
- Install a TFTP server on a Windows or Linux System
- Create a configuration file with a text editor and store it on the TFTP server
- From the switch, execute the config tftp command to download the configuration file and execute the commands it contains.
Installing the TFTP server on a Windows system will not be covered here. (In fact, it’s a pretty trivial matter. You can download a TFTP server app from SolarWinds, install it and be done with the whole shebang). Linux, on the other hand, requires a bit more “magic”.
Installing the TFTP server on Linux
Here are the steps I used to install a tftp server on Linux.
Step 1: Either install the tftp-hpa server from the Ubuntu software center or use the command line as follows
sudo apt-get install tftpd-hpa
TFTP_USERNAME="tftp"
TFTP_DIRECTORY="/srv/tftproot"
TFTP_ADDRESS="0.0.0.0:69"
TFTP_OPTIONS="--secure"
You should make the following changes (using an editor such as vi or nano) to this file:
- Leave the TFTP_USERNAME as tftp. The software expects this and adds this user to the /etc/passwd file.
- You can change the value of TFTP_DIRECTORY. The home directory of the tftp user is /svr so this value actually points to the /svr/tftproot directory as the directory where files will be stored for pickup by the clients. I went ahead and created this directory and chmod’ed it so that it was owned by the user tftp and in the group tftp.
- You can leave the TFTP_ADDRESS value as is. This value defines that the IP address of the TFTP server will be the same as the system that hosts it and that it will use port 69.
- You should change the TFTP_OPTIONS value to
FTP_OPTIONS="--secure --create"
This will allow the server to create any needed files that do not exist when files are uploaded to the FTP server.
Step 3: When you have completed any modifications to the configuration file, restart the server from the command line by entering:
sudo service tftpd-hpa restart
If the server can not be started without errors, the errors will be listed along with some instructions about how to see the conditions that are causing the errors. Most of the errors that occur are because of problems with the configuration file (e.g. misspelled on non-existent directories).
Testing Your Installation
It appears that the default install can only act as a server meaning files can only be downloaded to a client using the GET option.
To test your new TFTP server, on your Linux system, create a file (2 or three lines will do) using a text editor. Save this file in the directory specified in TFTP_DIRECTORY configuration parameter.
Then retrieve the file using TFTP. I tested this set up from a Windows workstation.
TFTP is not installed (by default) in Windows 10 so I had to go to control panel, select “Programs and Features” then check the box next to TFTP client.
One TFTP client was installed, I executed the following from the Windows command line.
c:> tftp 192.168.0.119 get tftp.txt
192.168.0.119 is the IP address of the Linux system with the TFTP server installed. GET specifies that you are retrieving (getting) the file from the server and tftp.txt is the name of the file that is being retrieved.
If all is well, you will see a Transfer Successful message with the number of bytes that were transferred.
Sources:
- https://irfantechinfo.blogspot.com/2013/09/installing-tftp-server-on-ubuntu-1004.html
- https://linuxhint.com/install_tftp_server_ubuntu/
- https://www.ittsystems.com/setup-configure-tftp-on-windows-10/
Notes:
If the Domain profile (windows firewall) is ON, all requests from the client are blocked.
If Windows Defender Firewall is ON, you can create a rule to allow TFTP to pass through the firewall as follows:
- Open Control Panel (display small icons) and select Windows Defender Firewall
- From the left column, select “Allow an app or feature through Windows Defender Firewall”
- Click “Change Settings”
- Click the button “Allow Another App” then scroll down and select “c:/Windows/System32/TFTP.EXE” as the program to allow through the firewall.
- Click “Network Type” and select the type of network (Domain, Private, Public) where you will allow the use of TFTP.
- Click ADD and the TFTP program will be added to the list of program that are permitted by the Firewall.
- Click OK
With this change, GET requests will work. PUT requests still fail with the error message “Connection Refused” (I’ll keep working on this!)
What’s Old Is Still Old and Still Good
We are being constantly inundated with “new and better” as the solution to everything. In the tech related world I hang out in, I so often see a push to replace something that you have been happily using for a long time with something that is new and better — just cause it is new. Over the years, I have learned that replacing the old with the new only makes sense if it solves some specific problem — not just because it’s new.
About Thinking and Algorithms
As humans, we are constantly striving to make sense of the reality that we are a part of. This process begins at birth and continues throughout our life. It is a natural, built in inclination of humans. We are innately built to ask “why” or “how”. We want to know and understand how and why reality is the way it is.
Human brains have the capability to take in information (learn), connect it to other pieces of information (things we have learned) and make conclusions.
We have the ability to re-use the information we have learned (remembering) and re-purpose previously made conclusions into new conclusions that help us make better sense and get a better understanding of our reality.
We say that we understand something when we are confident and comfortable that what we know adequately explains “why” something “is” in our perception of reality.
This process of taking in knowledge and making new conclusions is called thinking and at the core of thinking is learning — the process of absorbing and retaining knowledge so that it can be reused to make new conclusions..
Google (which is just a way to identify knowledge about a subject) “types of thinking” and you will find that thinking can be classified into many types. Just like there are types of sports (football, basketball, baseball, and squash) there are types of thinking.
As a teacher specifically of computer science, technology and programming, I am mostly concerned with what is called “computational thinking” which is well defined here and here.
[The] intellectual core [of computational thinking] is about formulating things with enough clarity, and in a systematic enough way, that one can tell a computer how to do them.
Stephan Wolfram
I started “thinking about thinking” because I noticed that many of my students struggle with how to solve very simple problems by writing computer programs. I noticed that there were some students that could instantly grasp the process of breaking down a problem or a question into small parts, develop an algorithm or series of steps to solve the problem, translate each step into a programming language and finally assemble the steps into a program that the computer used to solve the problem.
On the other hand, there were students who struggled not with the syntax of the computer language but with the process of how to create and describe an algorithm to solve the problem.
The students who struggled with this were not inexperienced in solving problems, they just were not aware of how to apply computational thinking skills to solve a problem.
An example from a class exercise is appropriate at this point.
I asked the students to tell me how they would solve the following problem.
If I gave you a pile of coins and asked you to how much money I gave you, what would you do?
One approach to solving the problem might be:
- You might ask for more information (like do I want the total dollar value or a do I want to know how many coins were in the pile)
- Once you understand the problem I was asking you to solve, you would use your previous knowledge about money to assign a value to each coin.
- Next, you might scan the entire collection of coins one at a time, pick up each coin and place all the coins with the same monetary value in the same pile.
- Next, you would count the number of coins in each pile,
- They you would multiply the number of coins in the pile by the monetary value of one coin in the pile and record the answer
- Finally, you would add up the monetary value of each pile to arrive at an final answer..
Granted, this is not the only (or even the correct or most efficient) way of solving the problem but it does show the process of thinking (specifically computational thinking) as a part of making conclusions or solving problems.
The students who could not write a program to solve the problem could demonstrate how to sort the coins but they could not write down the steps listed above and consequently could not write a program to do the task.
To help these students grasp the process and concept of creating a program, I outlined 4 steps:
- Ask questions designed to make sure that they clearly understood the problem and the requirements.
- Gather and make available what you already know about the problem
- Break down the problem into a set of smaller steps
- Write a statement that describes each step
- After executing all the steps, write the solution to the program
I also told the students that there were four techniques or tools that they could use. They could:
- Use Variables: that would allow them to remember the value of something from step to step and use one of the values they remembered in one or more steps
- Use Mathematical Operations: Change the value of a variable by using a mathematical operation
- Use Conditionals: Check if some condition is true or false and take action based on the conclusion
- Use Loops: Repeat one or more steps over and over but they had to know when to stop repeating and what to do when the repetition was completed
My Students Hate Lectures
Warning: Undefined array key "file" in /home/fbgluckc/public_html/sitefiles/wp-includes/media.php on line 1734
There’s a teaching problem that has been puzzling me for three years. I think I’m finally getting to the bottom of how to fix it.
Here’s what’s been bugging me.
My students hate lectures. In fact, most of my students despise them. I’m not sure if I will ever know the real reason why and it may not really matter why. What does matter is how I can address this problem — is there a way for me to hold “lectureless” classes?
It took a bit of experimentation and noodling (and some great ideas from a book called “How to Teach Digital Natives” but I think that I may be finally moving toward how to make this happen.
When I started teaching three years ago, all I had to go on with regards to how to run a class was my school experience. What I knew was to put together a lecture on a specific subject along with a set of notes that I presented as slides. I talked and used the slides for 30 minutes or so and assumed that at the end of the lecture that the students would be prepared enough to apply and demonstrate their newfound knowledge by completing a lab. I was transferring knowledge from me to them using the age old technique of talking and listening.
During the lecture, the students would listen (or so I assumed) but very rarely did they take notes or ask questions. If I asked questions of the class, what I mostly received back were blank stares. Discussion and class interaction about any of the points I covered was a rarity.
What I finally concluded is that my students were no better at understanding and applying the knowledge following my lecture. In other words, I was wasting my time preparing and their time delivering a lecture.
Needles to say, this was frustrating. This frustration is what moved me to start thinking about never delivering another lecture in my life.
What I decided to do to fix this frustration was a radical (at least to me) change in how I transfer knowledge.
Here’s what I did.
At the beginning of a unit, the first thing I do is make a list of items that I think my students should know about a subject, This list is based on my experience and any standards I must meet. I make this list in the form of questions (you will see why later). I also gather any other knowledge sources they might need (e.g. from a textbook, from Videos or from articles) all of which are posted on our Learning Management System. All this forms a set of knowledge resources that I used to jumpstart the next step.
Once I am comfortable with the target and goals, I hold a group discussion to introduce the unit.
I start out by giving a very brief orientation about the subject we are going to focus on. This is only an overview and does not go into any great detail about any of the knowledge they are going to focus on. I focus on why we are learning this subject and how it applies to real life situations.
Following the orientation, I appoint a class scribe to record the important points of a group discussion on a whiteboard. There are only two questions I ask in this discussion. The first question is I ask the students as a group to make a list of things they think they know about the subject we are going to explore. The second thing I ask is what they are curious about or what do they think they should know about the subject. I act as an advisor or guide during the discussion to make sure that the list of “to knows” generated by the group covers any unit requirements.
From what the students have on their list, and what I have on my list, I compile a final list of knowledge goals (in the form of questions) for the unit. I divide this list into sets and assign one set to each group (the number of groups depends on the class size. I like to have groups of 4 – 5 students). I form the groups by randomly assigning students (this lets everyone in the class eventually work with everyone else). I have each student write their name on a piece of paper, put all the names in a box and randomly draw names until the groups are completed.
The assignment I give to the students is that they need to find, document and present the answers to their assigned questions to the rest of the class. This makes the students the researchers AND the teachers. They learn to gather and sort knowledge themselves. They do the work using self-discovery instead of me talking at them.
In addition to this assignment, I also require the following:
APPLICATION: I assign one or more labs to the class. (All students are required to complete the same labs. I encourage them as they are doing the labs to either use the knowledge that they were just taught by the other students or do whatever research they need to do to complete the lab.
LITERACY: I prepare a list of vocabulary. The students have to provide the definitions. The vocabulary is taken from the chapter reading and other relevant material. Completing the vocabulary list can be done with the group but can not be copied from one person to another. Each student has to do their own work.
PRESENTATION: The students need to compile their knowledge into a presentation intended to teach the rest of the class what they learned.
STUDY GUIDE: To ensure that the students know the information that will be asked of them on a summative assessment, I prepare a study guide. The guide has a list of questions that must be answered and facts that they have to know. It also provides a section in the text where they can discover the answer. I required that these study guides be completed and turned in before the summative assessment is done.
During class time, students either work on the assigned labs, their vocabulary or work on their group presentation. While students work in class, I circulate around the classroom. As I circulate, I usually hear a number of discussions where students are working to complete the slides and answer the assigned questions. By listening to these discussions, I find that there are items that need clarification or that places where students need assistance. These items provide “teaching moments” where I can give either individual help or I can stop the class to explain a concept that is giving students difficulty. These teaching moments (which often involve demonstrations) are usually less that 15 minutes long and allow me to help the students where they are having trouble. No lectures…. just short teaching moments.
The first few times that students presented their material, I found that their presentations contained facts and procedures and answers that were flat out wrong. This was to be expected given that for many this was their first exposure to a subject but naturally, false facts and conclusions is not a desired learning outcome. What I decided to do to mitigate this problem was to require the students to show me a draft of their presentation. At this “review” we discussed the items in the presentation that either were not correct or needed further clarification. We would work as a group to identify and correct these items before they were presented to the whole class.
In addition to the core knowledge of the unit, the students gain the following skills:
- They learn how to do research using the Internet (the most complete encyclopedia that has ever been available to mankind).
- The learn how to identify true facts and false facts. (I emphasis the need to validate a fact from more than one source and to check the credibility of the site).
- The learn how to collect a set of information and assemble it into a cohesive presentation. (We also cover things like how to give a good presentation, how not to “read the content” of your slides, and what makes a good and bad slide presentation.)
- They learn how to verbally present and communicate information.
So, is this working? So far, so good. I require each student to keep a daily “exit ticket”. At the end of the week, I ask them to summarize their learnings in class and free-form write a paragraph about what worked for them and what did not work for them during the week. So far, students have been telling me that they like to be in charge of their own learning process and don’t miss the lectures at all. I am sure with this information and a bit more time and observation, I will keep tweaking and adding to this process but I am encouraged with the early results.
Stay tuned. We’ll see what happens.
Here’s a flowchart / overview of how I prepare for a unit.
Addendum
This video from Edutopia contains some additional information on the subject. It talks about eliminating the lecture as part of building a “lecture free”, blending learning classroom based around three concepts:
- Blended Instruction – students access content through teacher designed blended instruction. (Blended means that information is delivered to the student using methods such as video, labs, blended notes etc.). This leads to:
- Self-paced structure – students learning at their own pace within each unit of study. This allows for:
- Mastery-Based Grading – students progress from one step of the course to another only when they have demonstrated mastery of the previous subjects
Without the traditional lecture, the instructor is freed to assist students as they proceed through each of the unit subjects and students have the opportunities to work in groups using each other’s skills and knowledge.
This video from Edutopia is an excellent overview of how to implement Blended Learning in a classroom.
More Information, Resources and References
Documenting My Personal Workflow
Because of my current career as a teacher and my previous careers connected with technology, curating information and being able to quickly and accurately retrieve information is important to me.
Over the span of my 40+ year tech and teaching career, I have assembled and constantly adjust how I deal with information – everything from how to install and use GRUB to the size of the tires on my bicycle.
As part of the Career and Technical Education classes in computers and networking that I am currently teaching to high school juniors and seniors, I encourage my students to start developing a knowledge base that they will carry with them through their career. I also work with them so they understand and hone their information workflow¹ and how best to arrange and filter the information they receive and need for a successful technology career.
My Personal Workflow and Methods
The criteria I use for an application I “adopt” into my information workflow is simple:
- The app has to allow access from my PC, Mac, Web browser or mobile device. That way, I can get to the information I need from whatever device is available. My goal is to have an “always on” collection of information that I need.
- The app needs to do what I expect it to do. No hacking or “workarounds” allowed. It. Just. Needs. To. Work.
Here are the applications I rely on to manage my knowledge and “extend my brain”:
| Application | What it Does For My Workflow |
| Hand written notes | Not really an application but I find it fast and easy to take notes (which are typically filled with hand drawn pictures, scratched out text and are in anything but a classic outline form) using old fashioned paper and pencil / colored pens. I either take notes on the back side of scratch paper or in a small pocket sized notebook using colored pens. The more creative and “free form” I can be with my notes, the more I seem to remember. I review and edit and transfer my “scratch” notes to Evernote as soon as possible. This helps move information from my short-term memory to longer-term memory. |
| WordPress | I use WordPress for content creation and to post my content to a wider audience. Besides my writings at fbgluck.com (this site), I also blog at twoblockslong.com. |
| Google Workspace | For content that I am not going to post online and work related content such as class presentations, labs or spreadsheets I use Google Workspace (Google Apps) and Gmail. I also store most of my work related content and any E-books that I purchase on Google drive. |
| Pixlr Editor | For simple editing (cropping, resizing) of photos that I take and include in my notes and writings. |
| Lucidchart | Used to create diagrams and flowcharts. If I need to formalize and present a mind-map, I create it in Lucidchart. |
| Taskade | Taskade is a great tool to create classic outlines/notes for class lectures or to create step-by-step documentation of processes and procedures. |
| Goodreads | Goodreads is a PDF reader that I use to read PDF E-books (especially technical books). It allows me to arrange and notate PDF documents. I store PDF books that I purchase in Google drive. Goodreads allows me to store my PDF books in Google Drive. |
| Evernote | Evernote is the app I use to collect and organize just about all the work and personal knowledge that I use every day. I consider it the “hub” of my personal knowledgebase. From news sources, to class notes, to really trivial personal life facts that I need to remember (ask me the VIN number of my car), this information goes into Evernote. |
Here is a diagram that I put together to track how information flows into each of these apps and how they work with one another.
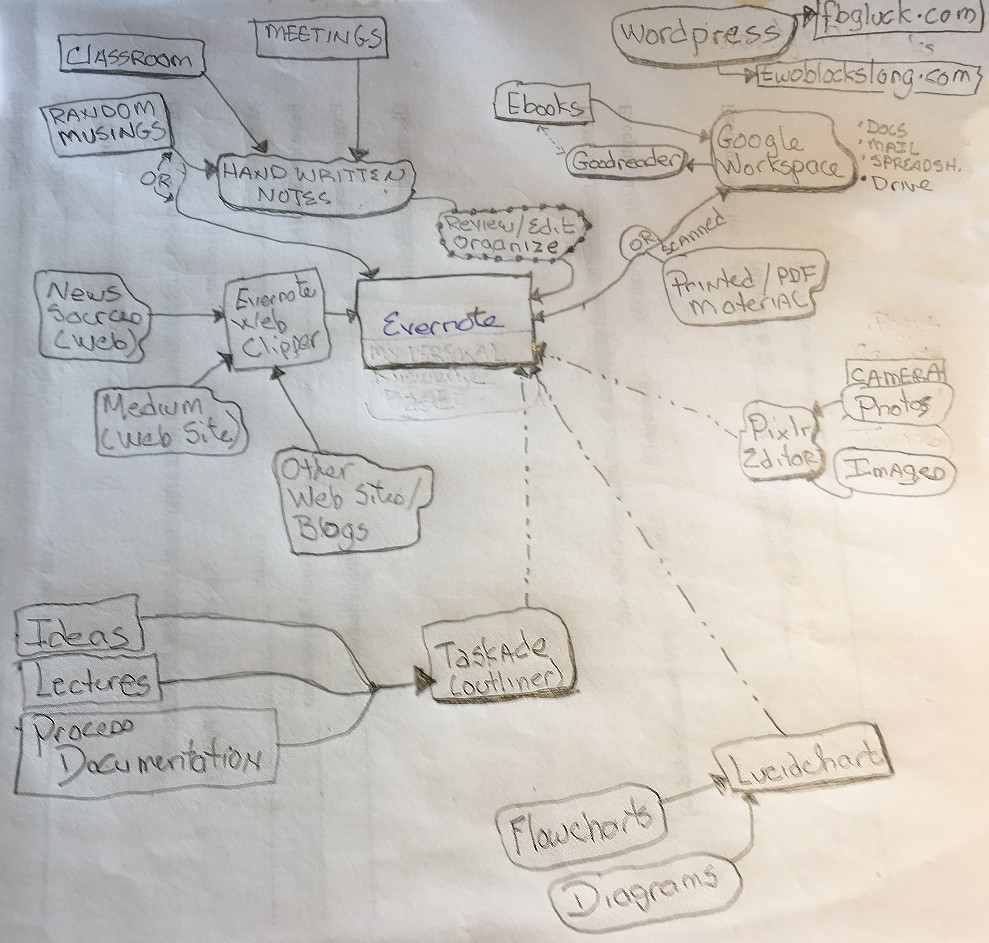
None of this workflow is static. It is always changing based on new applications I discover.
The newest application added to my favorites is Taskade and my oldest application in my workflow is Evernote which I have been using since 2010.
Footnotes:
- The term “workflow” is typically applied to the work done by designers or photographers. It describes how the product they create flows between startup and completion. I thought that the term “workflow” could also be applied to the flow of information used in our daily lives and how we collect and store it.
Class Portfolios – Arranging and Curating Knowledge
I am a CTE (Career and Technical Education) teacher. The subject that I teach (Information Technology and Networking) prepares my 11th and 12th grade students for their first job as a computer or network support technician or to continue their education in computer technology.
Part of what I would like my students to learn is how to start and keep a personal knowledge base of things that they learn. I read and researched “class journaling” but found I needed to extend the typical concept of class journaling to better fit what I teach and what is expected of computer and network technicians.
In the first few years of teaching CTE, I quickly discovered that traditional notetaking (journaling) is becoming a lost art. Very few of my students show up in class with a traditional notebook (much less a pencil or pen) to record what they are learning. They do however show up with portable computers (e.g. Chromebooks) or phones and our school has free and open wi-fi with access to the web.
I asked around to other teachers (inside and outside of CTE) and found that the absence of note taking is something they have also seen. I suspect (with no scientific evidence to back it) that since my students are so used to quickly and easily finding what they need to know from search engines, taking notes and building a personal collection of knowledge doesn’t seem important to them. Their attitude is “I can search for what I need so why bother to write it down?”
I decided (based on my long time experience as a technical support engineer) that electronically recording what you know in a way that lives beyond school, can be personalized and can quickly be retrieved is a valuable skill that can be used to replace traditional paper-based notetaking.
I now require that my students create a Digital Notebook / Portfolio for my class. When giving this as a requirement, I use the following to explain the how, why and where of keeping a personal knowledge base. I include the write-up I give to my students here. Feel free to borrow, adapt and re-use as needed.
Creating a Personal Knowledge Base For This Class
Your class portfolio (also called a personal knowledgebase) is a collection of the work and knowledge you collect from this class.
It should contain the following sections:
- Personal notes that you take during class lectures
- Vocabulary and terms that you need to know
- Copies of class handouts
- A Weekly Summary entry that summarizes what you learned for the week.(one for each week of class)
- Copies of work that you turn in (either to Google Classroom or to the Net Academy Learning Management System). This includes labs and processes that you write. A copy of every assignment you turn in should be in this folder.
- Any other items that you want to keep as part of your “knowledge base”
- I found that what I learned in a class at school had a longer life than the class itself. I actually went back and referenced what I learned later on outside of school. (In the second part of this course that you take next year, you will need to recall and remember a lot of what you learn in the first part of the course.)
- I kept a lot of pretty detailed written notes but found out it was really hard to locate specific information or processes from all the notes I had taken. When notes are kept electronically I can search them by subject or keywords to quickly retrieve what I need.
- As a computer and network technician, I was collecting so many procedures and new knowledge that I needed for my job (that’s the nature of technical information) that I couldn’t (or didn’t want to) keep it all in my head. I needed to “expand and extend” the storage capacity of my brain and recording things in a personal knowledge base was the only way I could do it. I needed what is often called a “second brain”.
- It was a very efficient way for me to study for exams and review what I learned.
Over time, I rearranged and curated this personal knowledge base so that now, I have my “personal Google” arranged the way I like it that contains only information that is important to me.
WHY IS A PERSONAL KNOWLEDGE BASE IMPORTANT?
When a customer asks a technician for help on a problem, the last thing they want to hear is “give me a second, I’m going to Google it). Anyone can Google (or You Tube) an answer to a problem. You are hired for your experience, knowledge and expertise. You won’t be hired simply because you can “Google it”.
Outstanding computer and network technicians need quick access to knowledge and solutions to problems. That’s what makes them successful. Still, I often get asked “Why do I have to do this? Google will tell me whatever I need to know”
Sure, Google and other search engines can give you “everything about anything” but there are a few things search engines don’t do when they give you answers to your queries.
- Search engines have no way of knowing if the information that they give you is the best answer to the question you ask and if it applies to the technical problem you are trying to solve. Only you can decide that. Because of this, you still have to search through all the items that the search engine delivers to decide what is applicable.
- Search engines don’t allow you to personalize, edit and add notes to the answer you get so that what you learn can directly and expertly be applied to your problem. For example, if you are looking for a procedure to remove an update from Microsoft Windows, there is a general set of steps that Google will deliver but in your situation, you may have other notes to add or procedures that you need to do or not do depending on your environment.
As I said before, a “superstar” computer and network technician is good at quickly and accurately retrieving the best information needed to solve a specific problem. That is what a personal knowledge base helps you do.
A WORD ABOUT THE TECHNOLOGY YOU CHOOSE FOR YOUR CLASS PORTFOLIO
- Don’t store what you learn using technology that allows someone else to copy or delete your information without your permission. I strongly discourage the use of your school Google account to store knowledge and encourage the use of accounts tied to your personal email address. Why? Because the day you graduate, it’s highly possible that your school account and all it contains will be deleted and two or more years of your work and what you learned will be lost forever!
- You may want to store your knowledge and work in a personal Google Drive account. That way, the knowledge you collect over two (or more) years will always be available to you. This is especially helpful when you start work or start college.
- Arrange your knowledge anyway you want. It’s your personal knowledge base so you should arrange it the way it works for you! Below is a suggested method I use to start the process. I have found that this works if you start with an organization and you are willing to rearrange it and experiment as needed. Eventually you will arrive at an arrangement that suits you and feels comfortable. (It’s kind of like personalizing your desk).
- Selecting the technology you will use for your “second brain” and how you will arrange it is a very personal process. It will take many iterations and arrangements to match how you think and how you work. Don’t expect to get it right the first time and don’t get discouraged. The final structure of your knowledge base should reflect how your life is organized and how you think.
HOW DO I START?
Here is a suggestion about how to arrange a personal knowledge base. (Note: This may or may not work for you as you get better at building and curating your personal knowledge base but this is a good point to start from.) . How you arrange knowledge is called a “taxonomy”
- I created a folder in Google Drive called “Class Digital Notebooks”
- Under the top level folder, I create a folder for each class I’m taking. This takes all my knowledge and places it into “collections” that make sense to me. It also reflects your “school life” since this is how school arranges the knowledge it is providing you.
For the rest of this example, I’ll use the class folder that I create for ITN (because you can replicate this structure into a folder for other classes or collection of knowledge as you need it).
- In my ITN folder, I create the following sub-folders
- Class Notes: In this folder are my class notes for ITN that I create using Google Docs. (I also scan to PDF and save any drawings or diagrams that I create during class in this folder). You can choose how to group and arrange your notes. You might want to have one Google Doc for each Unit / Subject we discuss in the class or create a sub folder for the unit and store notes and handouts (see below) in this folder.
- Completed Work (PDF): This folder contains a copy of everything I turn in for the class. I keep these documents as PDF documents because PDF is the closest thing to a universal document format that can be read by many different applications. This is important for longevity and will make sure that you can access your knowledge no matter what future applications you use.
- Handouts: Although paper handouts for a class are rare these days, this folder allows you to store handouts in electronic form. When I receive a handout, I scan the document to a PDF then store it here (or maybe in the appropriate subfolder in class notes). I then can toss the paper handout because it is now always available on-line.
- Vocabulary and Terms: This folder contains documents that record vocabulary and terms (and their meanings) that you need to know for the class. I keep these in a separate folder so I can quickly search these documents if I run across a term or acronym and need a refresher as to what it means.
- Weekly Self Assessments: This folder contains a copy of Weekly Self Assessments that I turn in every week as part of the class. Keeping these in a folder allows me to quickly recall what I learned in class, as well as what worked and what didn’t work for me and what learning goals I set for myself.
- WIP: WIP is an acronym for “Work In Process”. I use this folder for assignments and documents (for examples labs) that I am in the process of working on. That way, I can always locate them when they are needed. When I complete an assignment, I save it as a PDF and move it to my “Completed Work (PDF) file. Once it in in my Complete Work folder, I then turn it in to Google Classroom, Net Academy or other LMS that is being used in my class.
As I previously mentioned, as you get better building your personal knowledge base, you might need to re-arrange it by creating new folders and moving documents and notes from one place to another. The most important thing is that your personal knowledge base should reflect how you see the world and how you think.
Your personal knowledge base is a personal collection that is ever living and ever changing and is shaped by your experience and needs.
More Stuff To Do Than Just Teach
I’ll admit it. Teaching is a challenging job. Challenge is not a bad thing.
Because of this, I spend a lot of time figuring out how to be a teacher, how to teach and how to do everything else that comes with it.
Here are some of the big challenges that I am working on mastering:
Staying Above Water: My assigned teaching mentor (how happy I am to have one!) and other experts who willingly share with me have told me that for first-year teachers, your job is to just keep you nostrils above water. To do that, all you have to do is to stay one lesson ahead of your class. Survive your first year and things are moving in the right direction.
Your Ideal Classroom is not Real: I would love it if every one of my students were engaged and interested all the time. However, what I want, and what is, are two very different things.
I have (I had) a vision for my class that students were interested, and eager to learn and would be involved in discussions.
Of course that was from someone who is about 4 times the age of the people in the classroom and will never completely be immersed or understand in the society students live in and the pressures they face.
My students don’t get sleep, they are bored, they have bad days, they have a miserable home life or they just plain don’t care. Short of resorting to out-and-out bribery or being a top-level entertainer, I am coming to believe that this reality instead of my vision is the way it’s always going to be.
This fact is in no way going to cause me to put less effort into what I am doing nor does it cause me to enjoy teaching less but realizing this is the reality helps me deal with these challenges.
“Sometimes”, as my mentor said “you just have to let stuff go” – especially if you are dealing with an issue involving one student during class and dealing with the issue will disrupt the other 19 students who, for that moment in time are interesting and anxious to learn. I run into this situation all the time and have to make an on-the-spot decision to stop teaching and address the disruption or continue on with what I am doing.
It comes down to this. Am I providing an outstanding and productive learning environment for those students who are there to learn and, for those who may not be an ideal student due to outside circumstances, is there something I can do to encourage and lift them to a point where they can be?
You are Going to Spend a Lot of Time Not Teaching: An educational institution is a huge lumbering beast.
There are policies to learn, acronyms to figure out, and administrative tasks to take care of — not to mention training designed to help you perfect your craft (we call it professional development). There are handbooks, procedures and things like lockdown drills to deal with.
Cultivating some sort of relationship with every student is also critical to your responsibilities as a teacher and to a healthy classroom.
All of this is in addition to things that are directly related to teaching (like preparation, presentation and evaluation).
It’s just a fact. There is no escaping it and it all requires time.
My vice principal unknowingly dropped a precious bit of wisdom on me the other day when he said “There’s no such thing as overtime in this business!”
Better truth was never spoken. There is always some non-teaching task to do so buckle down and expect it.
The Clock Rules: As a teacher, a huge amount of your life is driven by a schedule — and it’s not always an easy one.
For me, an easy schedule is one that I can understand. One where things change on the hour or half hour (people who developed calendaring programs know this because usually give you a default option of starting and ending at :00 or :30). Schedules that are also somewhat regular and repeating without exceptions are also something I can relate to.
Nope … not even close. As a teacher, time like 10:08 and 1:16 become important and lunch is not at noon (like the rest of the world) but at 10:20 (who eats lunch at 10:20 and why don’t they refer to it as “mid morning break?”) I have to leave the house every morning at 6:15am to get to school and I can’t even think of being one or two minutes late for my first class. Don’t. Be. Late. Always remember that!
Oh yea, you have to know if it is a Red Day or White Day because that makes a difference in my schedule which is further complicated if it is Early Release Wednesday. Arrrrrgh!
Looking Ahead: I am spending a lot of time evaluating the learning environment I was left and planning what I want it to be. This includes everything from how to arrange the tables and chairs in my classroom, to what materials are needed, to curating the collection of information that I am going to present.
It’s a slow process that requires experience with the curriculum, knowing what resources you have available to you and experience with the culture and capabilities of your student population.
And I thought that I was just going to teach. Ha!!!
Information Curator
In the past, when textbooks were king and there was no web, the collection of information presented in your class was handed to you in a form called a textbook. This collection of words and pictures was curated by someone else (an expert in their field) and may have suffered from obsolescence as soon as it left the printer.
I’m finding that as a teacher in today’s world, I am not only a deliverer of information but I am also an information curator.
I realized this added role when I discovered that there is no suitable textbook that I could use for my courses.
In place of a standard, static textbook, I decided to rely on a collection of information that I would curate. This collection would then be used to reinforce concepts I feel my students need to understand.
This information collection I curate comes in many forms (videos, still images, printed items, recording and web pages) and from many sources.
My job (and it’s a big one) is to locate the sources, review them all and pick ones that are truthful, accurate and from credible sources. As time goes on, I expect that I will add to, remove and replace items in this collection.
The advantage of this is that I can teach from relevant information that is always up to date. When teaching technology, like I do, this is important simply because of the speed at which things change or are replaced.
Conveying this collection of information to the students is a challenge and a lot of work.
Right now, I am experimenting with using Google Slides (it works well with Google Classroom that has been adopted by our district but I am sure Power Point would would work as well) as a flexible tool where each slide (page) contains printed matter, images, customized figures that I create and links to other items from the web. I am keeping one slide deck that is easy to add to or reorder as I adjust how I present my information.
This is also a cost saver for my students and district in that I don’t need to by expensive textbooks that, by design, have built in obsolescence.
I am finding that a weakness of this method is that as the slide deck grows larger, locating particular pieces of information gets to be a challenge because there is no method to automatically index or provide a table of contents for the entire slide deck.
Call it a work in progress.
Information Firehose
First off, let me say that early on in my current teaching assignment, I learned one thing really fast. There is an enormous amount of information that I, as a teacher have to absorb.
Obviously, there is information related to my subject expertise of computers and networking. But, on top of the subject matter information, there are streams of information coming at you that have to do with school policies, student needs and requirements (medical issues, IEP issues, names etc.), schedules (do I have that elective class today or is that only on Red days), handbooks and budgets.
In my first week (classes haven’t started yet) I was amazed at things that I have to learn that don’t even have to do with actual classroom time.
I’ll relay a few things I have learned that might help…
First — find (or have someone assign you) a mentor. You mentor will help you understand all the school lingo, abbreviations, schedules and the host of other policy issues that will come your way. Use your mentor to ask questions and understand the reasoning behind procedures. Not knowing these things won’t destroy you but they will but a lot of bumps in your road. Three words of advice… Ask. Your. Mentor.
Second — Organize your information using tools and a taxonomy that makes sense to you. My first week was orientation. Needless to say I collected a lot of paper. It took me about a week to sort through what I got and decide how to organize it in a way (categories) that made sense to me.
You should also realize that a lot of the information you get won’t come in paper form but is gathered in conversations and notes you take in training sessions. You’ll also be meeting a lot of new people and have to remember what they do and how you will interact with them.
Since I am a big user of Evernote, after I sorted through the information I got, I added a notebook stack to Evernote that matched the categories of information I got. I now have a place to put scanned copies of paper and a place to add notes and other resources that is easy for me to retrieve.
Third — Start collecting ideas. I carry around a notebook and scratch paper to jot down ideas for class activities and to note ideas and subjects where I need to do more research. I put rough ideas and information into this notebook that I will later on edit and put into Evernote and develop further.
Fourth — Work your calendar. Figure out a way to keep a calendar that is accessible to you at all times. You will have due dates, meetings, and schedule changes. If possible, integrate this with your personal calendar so you can overlay one with another. I use two Google calendars. One for work and one for personal. I share my personal Google calendar with my work account and I share my work calendar with my personal Google account. That way, I can see both sides at one time.
Also, work your daily and weekly schedule. Make sure that you have personal time for curriculum development and research as well as class tasks (grading etc). Also make sure you block time out for “office hours” to give assistance to students if they need it and for faculty development days.
Once each week, allocate some time to plan out the next week. Keep a weekly calendar that shows schedules, meetings, tasks that are due and subjects to be taught. Our principal sends out a weekly update before the start of each week and everything I need from this update is transferred onto my weekly calendar.
I keep my weekly calendar on paper for quick access and reference. I have one page that I print out each week that has the information I need. A copy of it come with me wherever I go.
Seems like a lot. Kind of like trying to take a drink from a firehose. All this “outside the classroom” stuff and we haven’t even started the actual teaching process yet.
A Slightly New Direction
Over the past many years, most of my involvement in “things technical” has been in customer support, marketing and Systems Administration — all positions I have loved. I have interlaced these “full time” positions with teaching as the opportunity arose, mostly as part of an adjunct faculty at post-high school institutions.
After one last (disastrous) 7 month position that was basically a 24 x 7 support-a-thon that allowed me very little personal or free time, I was fortunate enough to be able to have a summer (the first one in 30 years) where I didn’t have to work but had enough time to be able to take a much needed breath and work things out. (more…)